Pixel Size and Magnification
Most files say how big a pixel is, and many say which objective took them. Some do not, and some get it wrong. Set the right values yourself, and the viewer measures in micrometres.
Your file is never changed. The values you set live with the image in the viewer, and travel in a shared link.
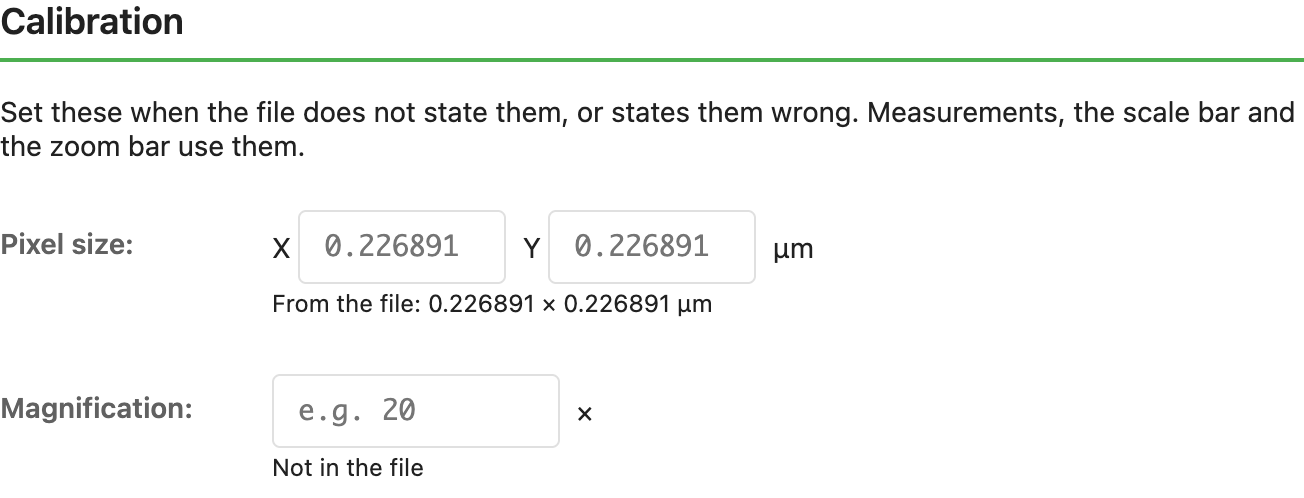
Set Them
- Click Info, the (i) button in the toolbar, to open Image Information.
- Go to Calibration, below Metadata.
- Type the values and click Save Changes.
| Field | What it is |
|---|---|
| Pixel size | X and Y, in µm. An image with planes shows Voxel size, with X, Y and Z. |
| Magnification | The objective, such as 20 or 40. |
Under each field you see what the file states, for example "From the file: 0.2269 × 0.2269 × 0.5 µm", or "Not in the file".
A few things make typing quick:
- X fills Y. Type X and Y follows. It fills Z too, when the image has planes and the file states no Z step.
- Your own value stays. A field you change by hand stops following X.
- A comma works as a decimal point:
0,25is0.25. - A wrong value shows red. Only numbers above 0 count, and Save Changes waits until each field is one.
Use the file's values clears your own and goes back to what the file says.
What Changes
- Pixel size. Distances and areas, the scale bar, the zoom bar and the position under the cursor switch to µm. Measurements you already drew update at once. An image whose file had no pixel size measured in pixels before. Now it measures in µm. A length reads in mm from 1 mm, and an area in mm² from 0.1 mm².
- Magnification. The zoom bar shows it, for example "Zoom: 50% · 20x".
- Z step. It shapes the 3D view: the proportions of the volume, volumes in µm³, distances and the Position card. Save while 3D is open and the view reopens at the same place, with the new step. Your labels, structures and annotations stay where they were.
The Metadata section still shows the file's own values.
When the 3D View Looks Flat or Stretched
A wrong or missing Z step is common. A volume can look flat as a coin, or stretched like a tower. A file with no units can read as 1 × 1 × 1. Enter the step your microscope used, for example 0.5 µm or 2 µm, and the volume takes its real shape. See 3D Rendering.
Magnification Is Never Guessed
The viewer shows a magnification only when the file states it, or when you enter one. A file gives the size of a pixel on the sample, and that alone does not tell which objective took it. So the zoom bar stays without a magnification rather than show a wrong one.
What Each Format States
| Format | Pixel size | Magnification |
|---|---|---|
| OME-Zarr | Yes | When the dataset holds its OME metadata and names an objective, or holds only one |
| OME-TIFF | Yes | From the objective in the file |
| Zeiss CZI | Yes | From the objective the image names, or the only one |
| Aperio SVS | Yes | Yes |
| Hamamatsu NDPI | Yes | Yes |
| Leica SCN | Yes, for each region | Yes, for each region |
| Philips TIFF | Yes | No, enter it here |
| Akoya QPTIFF | Yes | Yes |
| 3DHISTECH MRXS | Yes | Yes |
| DICOM WSI | Yes | Yes, unless the finest level was resampled |
Each format's page says more. A file that leaves a value out still opens. Enter it here.
Share It
A link you copy carries your values, so the person who opens it measures in the same units:
| In the link | Means |
|---|---|
px=0.25 | Pixel size along X, in µm |
py=0.26 | Pixel size along Y, only when it differs from X |
pz=2 | Z step, in µm |
mag=40 | Magnification |
You can add them by hand too. This IDR volume opens with a Z step of 2 µm:
https://find-nuclei.github.io/?url=https://uk1s3.embassy.ebi.ac.uk/idr/zarr/v0.4/idr0062A/6001240.zarr&pz=2Your values are also saved with the image in the viewer, like your channel settings. Open it again and they are back.
Image credits
The screenshot uses Philips-1.tiff from the OpenSlide test data, CC0. See Sample Data and Credits.
Related guides
- Sharing Views
- 3D Rendering
- Annotations, for distances and areas
- Supported Formats