Annotation Templates
Templates are reusable annotation configurations. Each one bundles a color, a class label, optional extra metadata, and a keyboard shortcut slot. While a template is active, every annotation you draw inherits its settings automatically.
If you catch yourself repeatedly drawing "tumor → red → class: tumor" or "blood vessel → pink → class: vessel", you want templates.
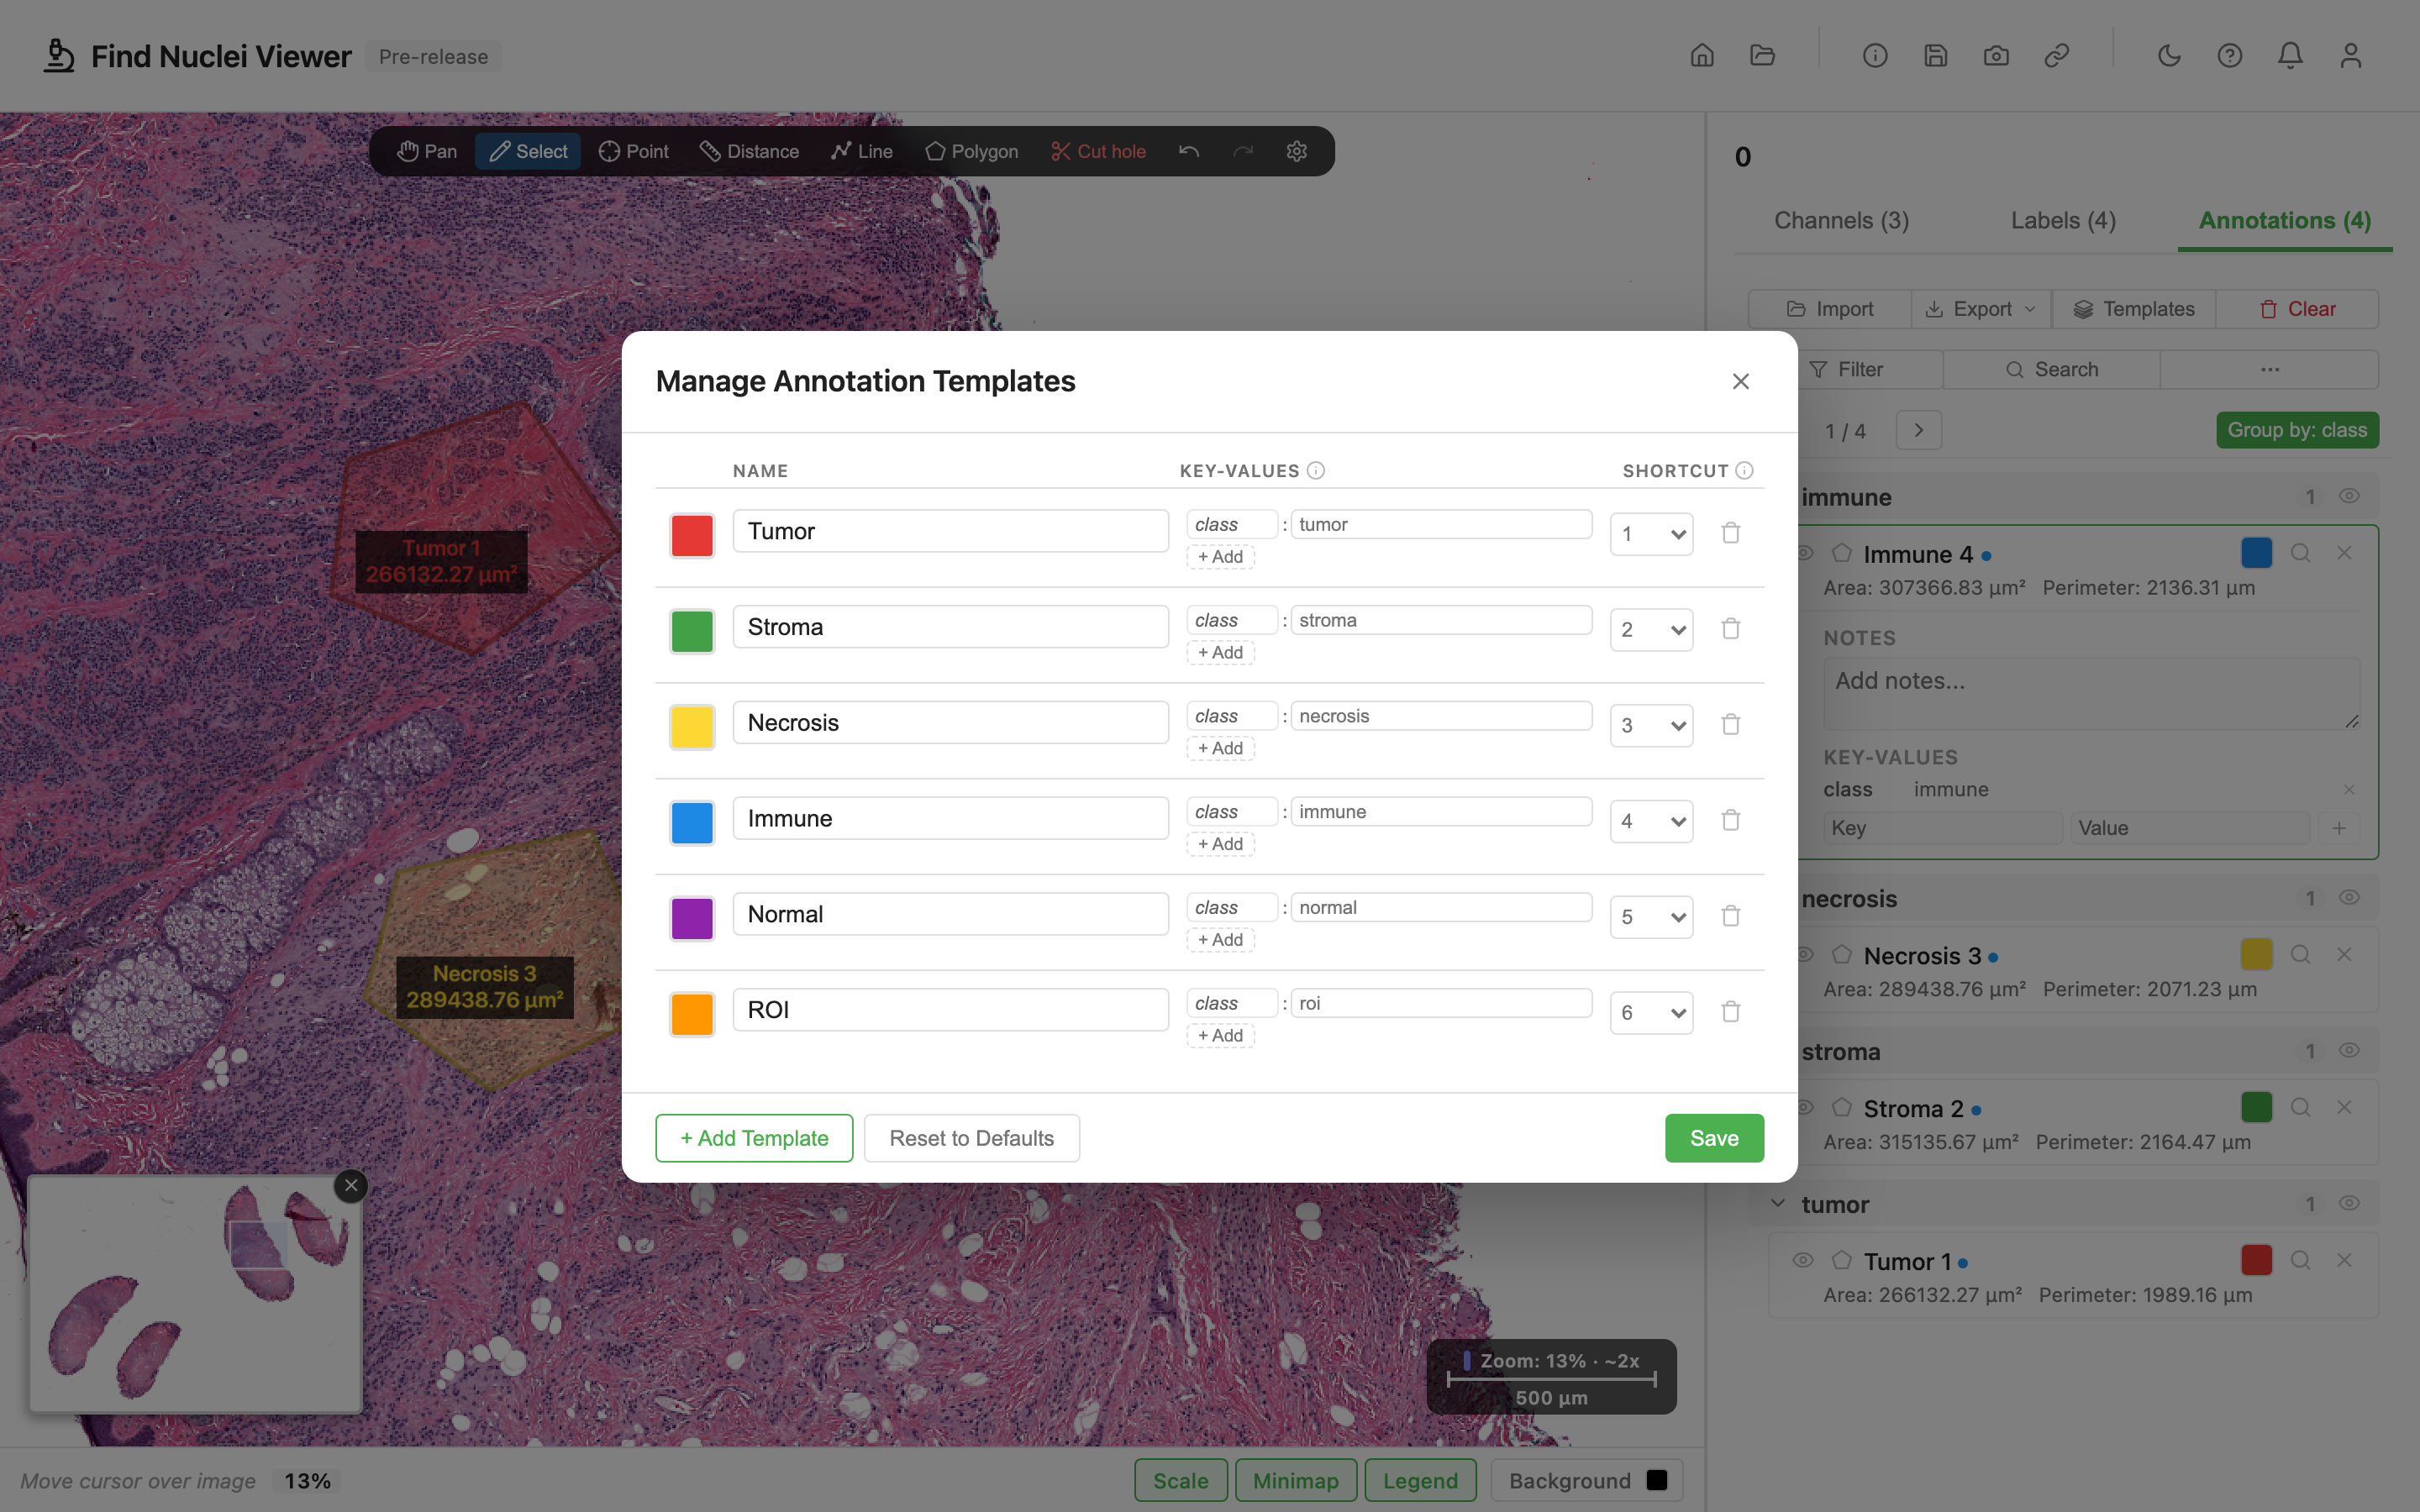
Default templates
Find Nuclei Viewer ships with a handful of sensible defaults: Tumor, Stroma, Necrosis, Immune, Normal, ROI. Each has a reserved keyboard shortcut (Alt+1 through Alt+6) and a curated color.
You can use them as-is, edit them, delete them, or add your own. Edits and additions persist per browser and survive reloads.
Template Manager
Click Templates in the Annotations panel toolbar to open the Template Manager modal:
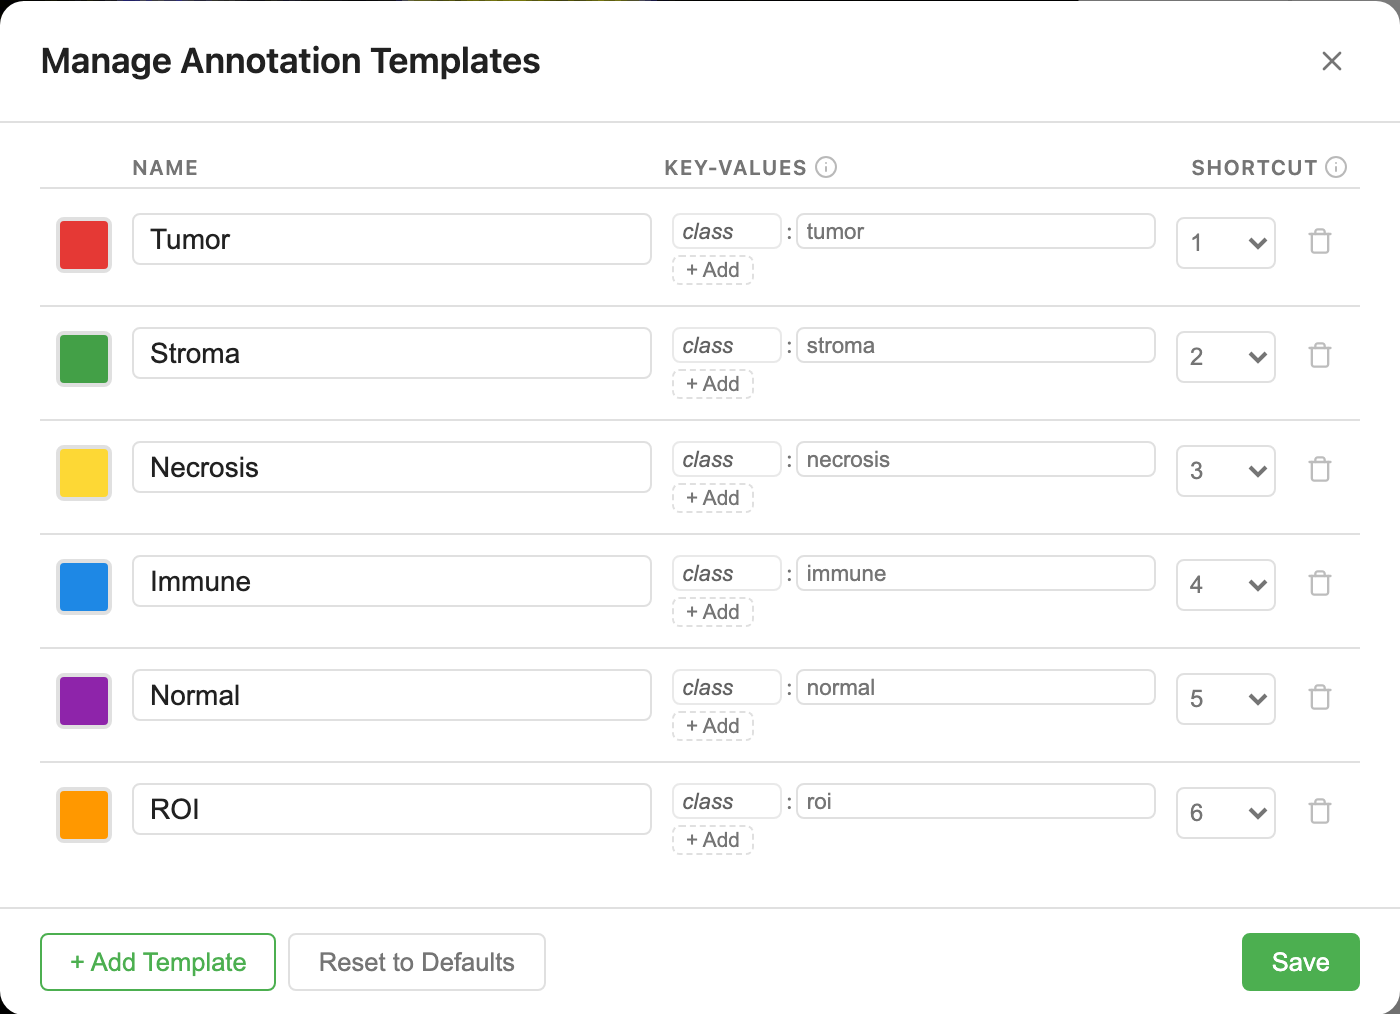
Each row has:
- Color swatch: click to pick from the preset grid or type hex / RGB
- Name: the display name that appears in the on-canvas chip row and the Annotations toolbar dropdown
- Class: the value stored in
keyValues.classon every annotation drawn with this template. Also drives the annotation list's default grouping. - Shortcut: the
Alt+Nslot (1–9). Blank = no shortcut. - Delete: remove this template (annotations already drawn with it keep their class + color; only the template is removed from your set).
At the bottom of the modal:
- Add template: append an empty row to create a new one
- Save / Cancel: commit or discard your changes
Applying a template
There are three ways to apply a template to an annotation.
1. Pick one, then draw
With a drawing tool active (Polygon, Line, Point, etc.), an on-canvas chip row appears showing every template as a color chip. Click one to set it as active. Every annotation you create next inherits that template.

The chip you picked stays active until you pick another, clear the active template (click the same chip twice), or switch tools.
2. Keyboard shortcuts
Templates with an assigned Alt+N shortcut can be activated without touching the chip row. Press Alt+1 through Alt+9 to flip the active template; the on-canvas chip row updates so you can see which one is live.
Shortcuts are global while any annotation drawing tool is active. They don't interfere with form inputs or other keyboard handlers.
3. Re-template an existing annotation
Select an annotation, click its color swatch. The swatch popover opens with a Template dropdown at the top:
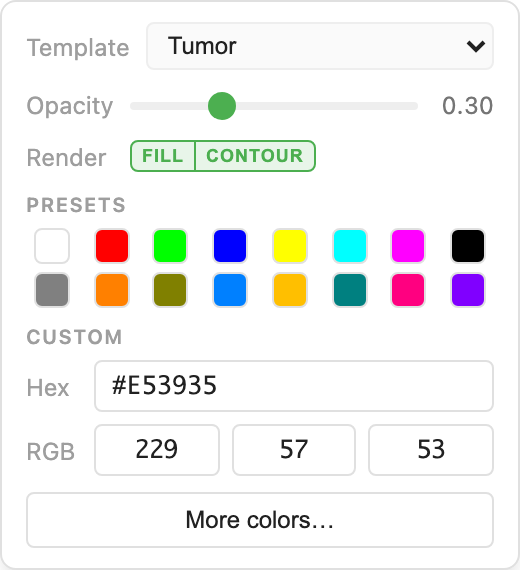
Pick a template and the annotation's color and class key-value update in one step. The label updates too, if it contains the previous template's name (Tumor 1 → Stroma 1). The list reorders into the new class group and the canvas smoothly zooms so you don't lose track.
4. Bulk-apply to many annotations
Select several annotations (list multi-select or canvas lasso), then pick a template from the bulk action bar's Template dropdown. Every selected annotation is reclassified in a single undoable step.
Label substitution: how it works
When you re-template an annotation, the viewer looks at the annotation's current label. If the label starts with the old template's name (e.g., Tumor 5), the substitution replaces just the name portion: Tumor 5 → Stroma 5.
Annotations with custom labels (my cell of interest) are left untouched. The substitution only fires on auto-generated names. Labels like Tumor apex also get the prefix swapped to Stroma apex because the template name is the leading word.
Conventions we recommend
- Keep class values lowercase, single-word.
tumor,stroma,necrosis. This keeps URL state compact and pairs well with downstream CSV export whereclassoften becomes a column header. - Keep template names human-readable.
Tumor,Stroma,Blood vessel. The name shows in the chip row and legends; class is the machine-readable identifier. - Use shortcuts sparingly. Assign
Alt+1..4to the three or four you use constantly. The rest can live in the dropdown. You'll reach for them rarely and the Alt+5..9 slots stay clean. - One template per class. Multiple templates with the same class value confuse the legend and the detail panel. If you need variations, use key-values (e.g.,
class: tumor, grade: G1) rather than parallel templates.
Persistence and sharing
Templates persist in your browser's IndexedDB, keyed by installation (not by image). Opening any image in the same browser picks up your customisations.
The URL state carries the active-template ID when you share a link, so a reviewer opening your link sees the same template pre-selected. The full template set itself doesn't travel in the URL. If you send a link to someone who's never customised templates, they see the defaults. This is by design: templates are your personal preset bank, not per-image configuration.
Sharing a custom template set
If you need teammates to use your custom templates, the easiest path today is a screenshot of the Template Manager for them to recreate. A template import / export feature is on the roadmap.
Mobile
Template Manager and the on-canvas chip row both work on touch devices, but the drawing tools that activate them are primarily desktop / tablet workflows. On phone viewports the Annotations tab is read-only.
Image credits
The screenshots on this page use a public whole-slide H&E section. See Sample Data and Credits.
Related guides
- Annotations: the full annotation workflow
- Sharing Views: URL state captures the active template