3D Region
A region is a box you draw on your image. 3D then shows only what is inside the box.
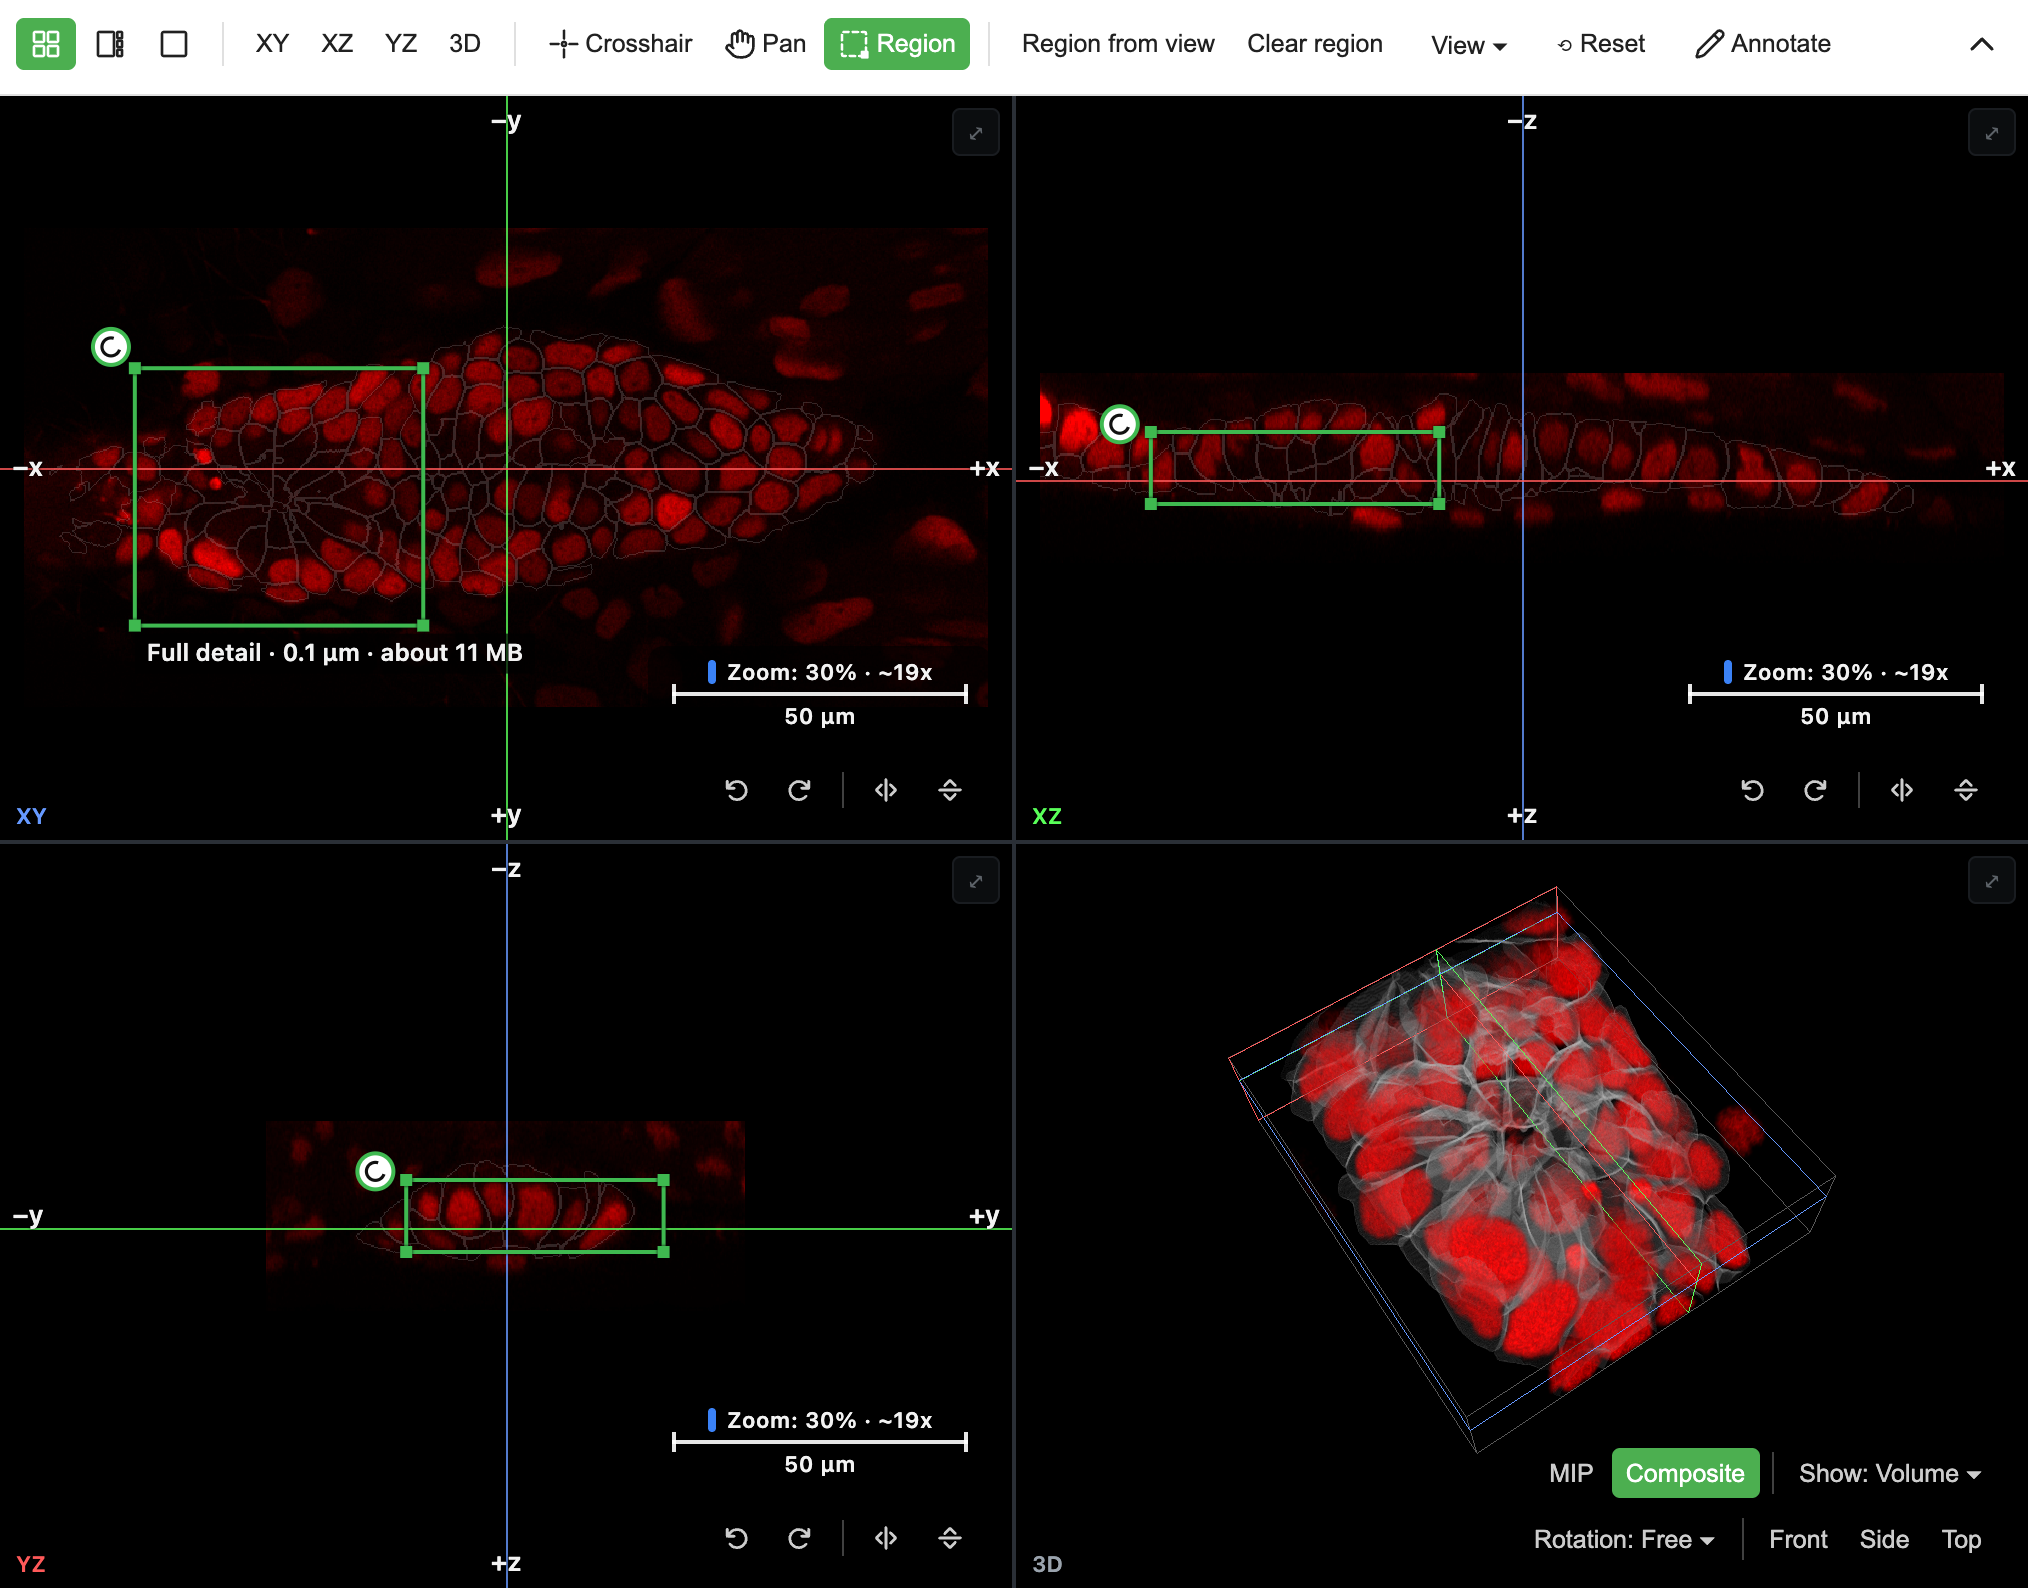
One box, drawn on XY, XZ and YZ. The 3D panel shows only what it holds. The readout on XY says what you will get: full detail, 0.1 µm, about 11 MB.
Use a region when:
- Your image is too large for 3D. A graphics card holds about 2,048 voxels per side in 3D, so a large slide shows coarse. A box of that size shows at full detail.
- You want to see inside. The outer cells hide the inner ones. A box cuts them away, and it cuts your labels with the image.
- You want to read less. A box reads only the data it holds, so it is quick over a slow connection, and it works on an image stored at one size only, with no pyramid.
Before anything loads, the box tells you the detail you will get and the size of the read.
A worked example
How to Explore and Render 3D Images Beyond Memory runs these workflows on real data, with links that open each view.
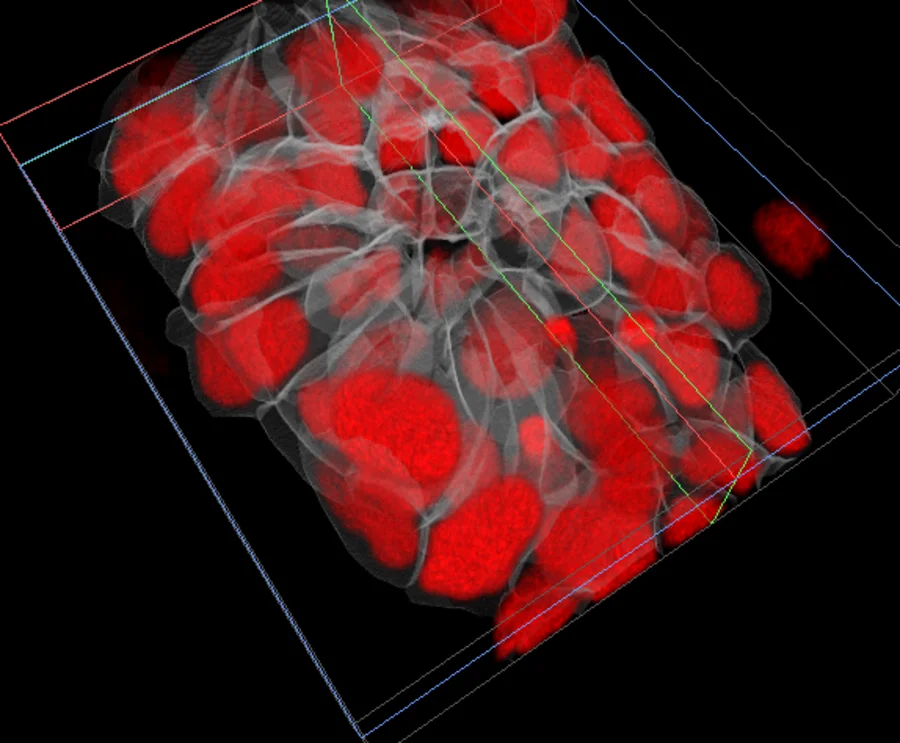
A rosette in the zebrafish lateral line primordium (IDR idr0079): cell walls drawn from the segmentation converge on its centre, around the nuclei in red.
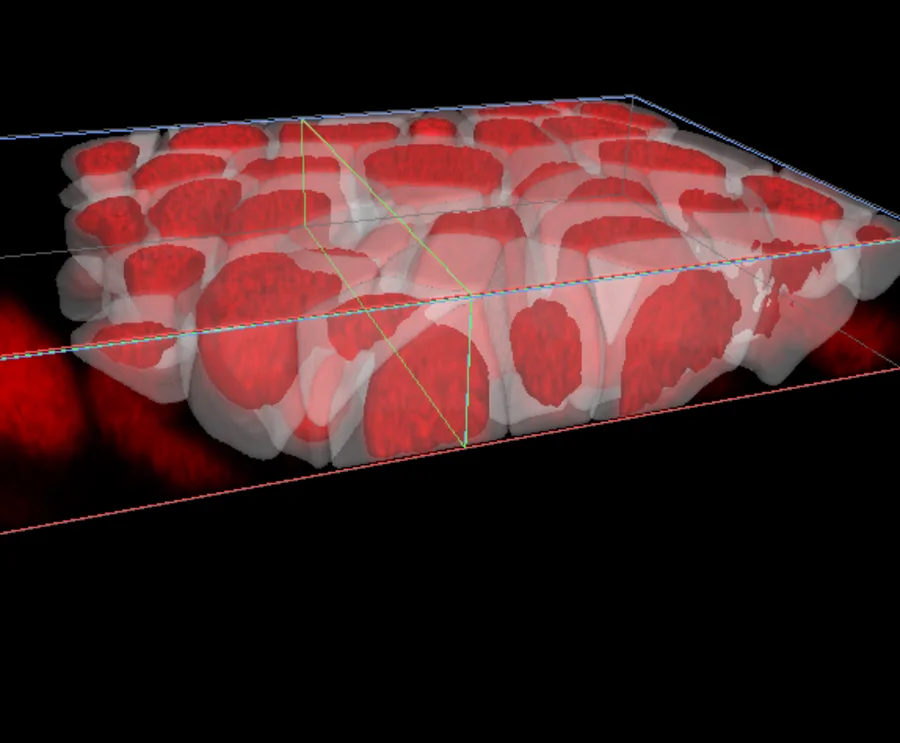
A thinner slab of the same primordium, from the side: the nuclei are cut at the edge of the box, inside their cells.
Left: a box of 474 x 423 voxels and 54 z-sections, about 11 MB at full detail. Label: Volumetric, Contour only, white, opacity 0.15. Channel: NLStdTomato, contrast 6 to 123, 3D opacity ramp 31 to 137; the membrane channel is off. Composite. Right: a box of 260 x 411 voxels and 30 z-sections. Label: Surface, Solid white, opacity 0.25. Both are credited under Image credits.
Prerequisites
- An image open in 3D, in a desktop browser with WebGPU.
- For the labels workflow, a label on the image. See Labels in 3D.
Set a box
There are two ways, and both give the same box.
Draw it:
- Click Region on the toolbar above the panels.
- Drag a box on the XY, XZ or YZ panel. Each panel sets its own two axes and leaves the third: XY sets X and Y, XZ sets X and the z-sections, YZ sets Y and the z-sections.
- Read the box's readout while you drag. Nothing loads yet. It shows on XY, and on XZ or YZ while you drag there.
- Let go. The 3D panel empties, then fills with the box as 3D reads it.
Take what you see:
- Zoom the panels to the part you want.
- Click Region from view.
X and Y come from the XY panel. The z-sections come from the XZ or YZ panel, only if you zoomed or panned that panel last and it shows fewer z-sections than the image. Zooming XY never narrows the z-sections.
Region from view works in Crosshair, Pan and Region, and needs the XY panel on screen. If XY shows all of the image and no z-sections come from a panel, it clears the region instead. A z range you already set stays until you use Clear region.

To change a box, turn Region on and drag a side, a corner or the middle. In Region mode the wheel zooms the plane, and Cmd or Ctrl + wheel steps the slice.
Clear region appears next to Region from view once a region is set. It goes back to the whole image, z-sections included, and so does Reset.
Turn the box
A straight box cuts along the image's own axes. To cut at another angle, for example across a rosette, turn the box:
- Turn Region on. A round marker shows by the top left corner of the rectangle on each panel.
- Drag the marker. The box turns about its centre, and the 3D panel follows as you drag. Hold
Shiftto turn in steps of 15°. - Let go. If the turned box reaches past what 3D has read, it reads the rest. The camera stays where it is.
Turn it on a second panel to tilt it further. To straighten a panel, double-click its marker.
The rectangle is what you hold: its corners, its sides and the marker. Each panel turns it by that panel's angle alone, so once the box is turned, the rectangle on the other panels is only close. The dashed line shows the true cut on the section you are on, and the 3D panel shows the whole of it. The dashed line goes when the section is outside the box.
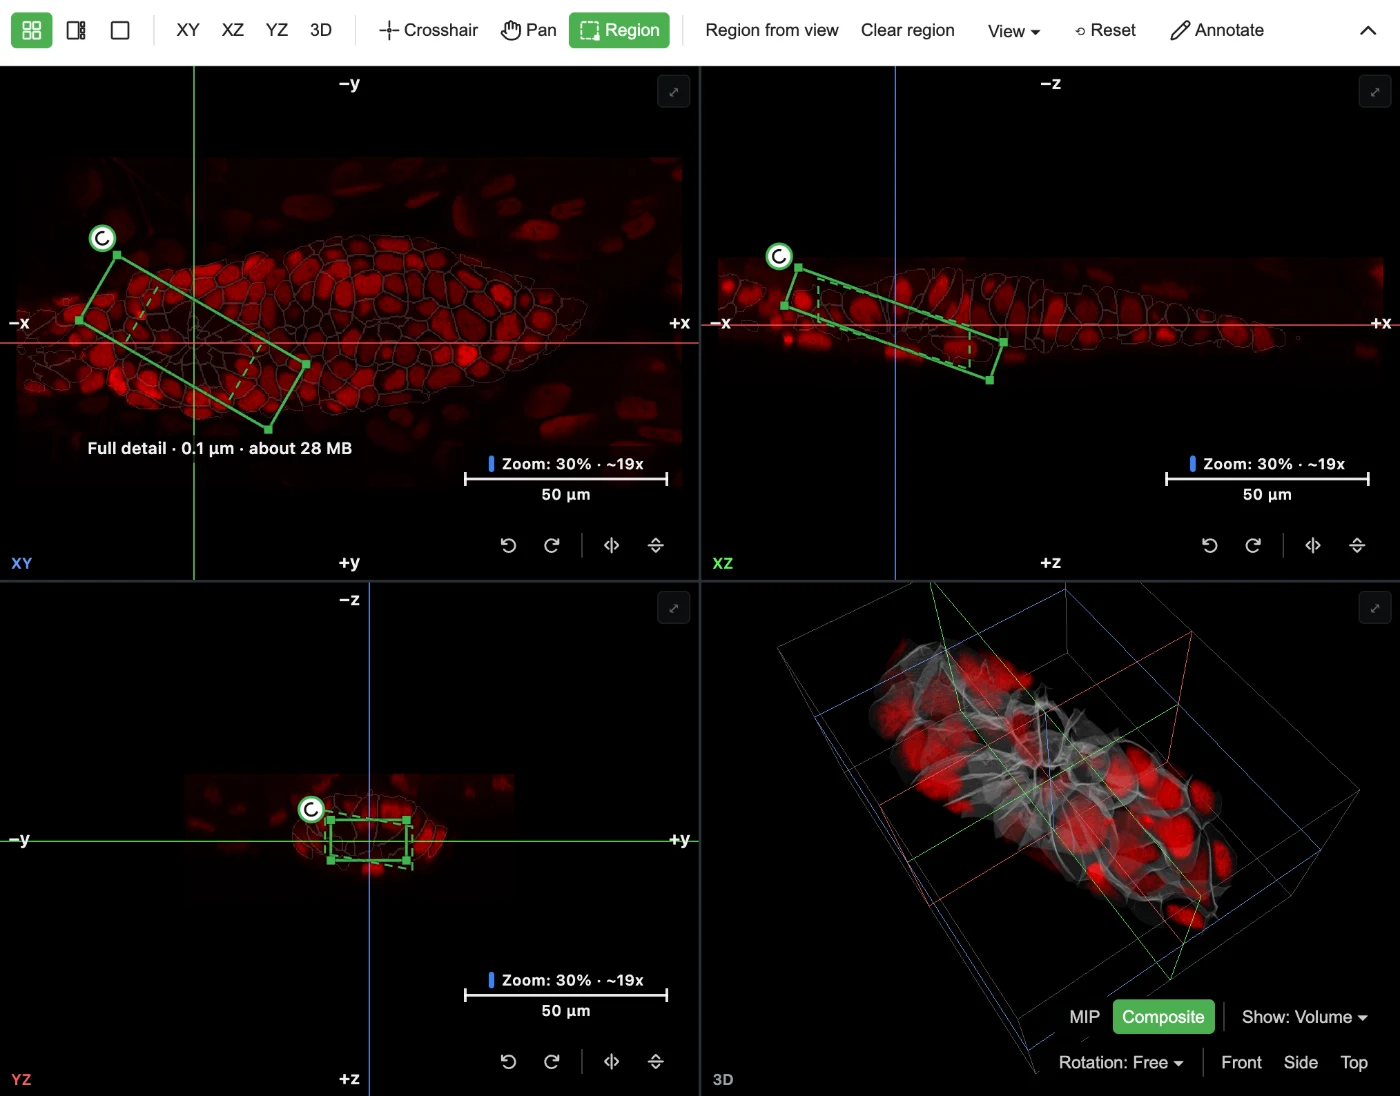
A turn changes only what you see, and the data stays as it is stored. The grey box in the 3D panel stays straight, as it shows the data read.
Read the box before you let go
The readout shows what 3D will give for that box, for example:
Full detail · 0.21 µm · about 130 MB
| Colour | What it means |
|---|---|
| Green | Full detail: the box fits as it is |
| Amber | Only coarser detail fits, and the readout says which: 1/2 detail, 1/4 detail |
| Red | Nothing fits at this size: "Too large for 3D at this size" |
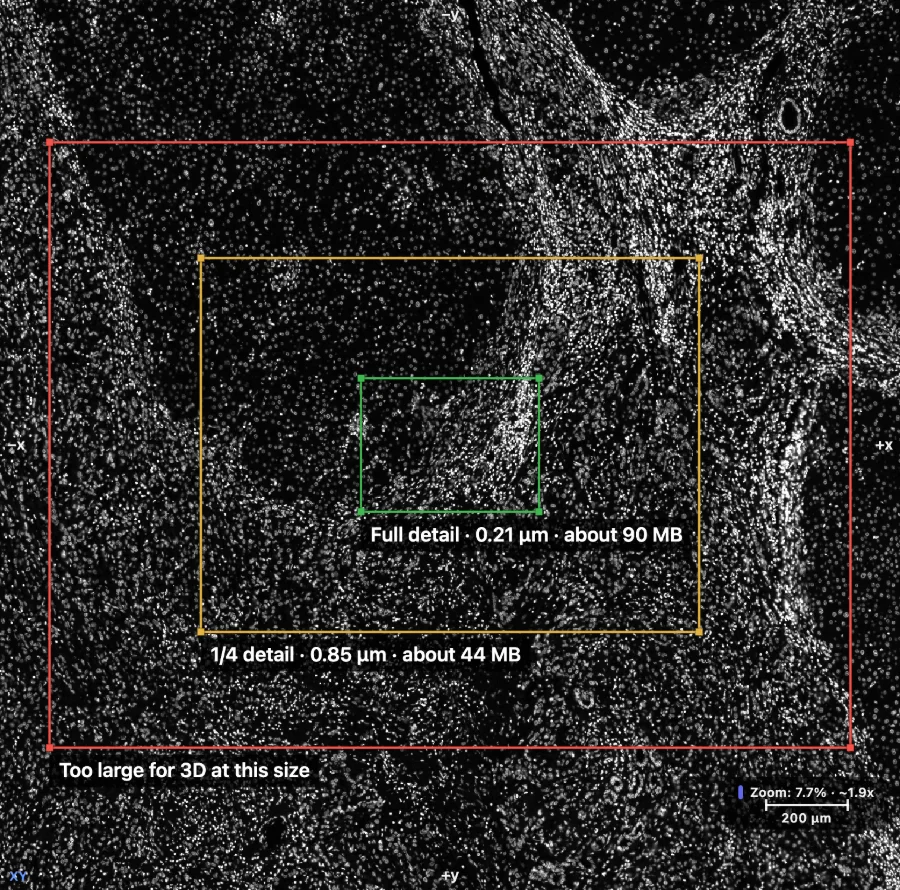
One place on a slide, three sizes of box. This is a mockup: you see one box at a time, and this slide never turns red, as it is stored at many levels of detail.
To find the largest area at full detail, shrink the box until it turns green. The readout counts the channels you show, your labels, your 3D memory setting and your graphics card. What it says is what 3D reads.
A red box can still be set. When the image is not stored at any detail that fits, 3D offers to read the box once at less detail in X and Y, with the size of the read.
Workflow: look inside a tissue
Composite shows near things in front of far things, so the outside hides the inside.
- Show the channels you want, and click Composite.
- Choose Region, and on the XZ panel drag a thin box through the depth you want.
- Turn the 3D view until you look through the cut.
- Drag the box up or down on XZ to move through the tissue. Each move reads again on release.
A thin slab reads little, so moving it stays quick.
Workflow: check a segmentation in place
- Show the label as a surface or as Contour only, at a low opacity, so the image shows through. See Labels in 3D.
- Draw a box through the part you doubt.
- Turn the view to the cut face. Each nucleus sits in its cell, cut by the edge of the box.
- Open the cut on another axis by dragging the box on YZ.
Labels are cut with the image, and surfaces build for what is in the box. An object cut by the edge shows cut.
Workflow: one area of a very large slide
- Open the slide in 3D. It shows coarse, and a notice says how coarse.
- On XY, zoom to the area you want.
- Click Region from view, or draw a box until it turns green.
- To look at another area, drag the box there and let go.
A box reads only the part of the image it holds, so it also works on an image with no pyramid.
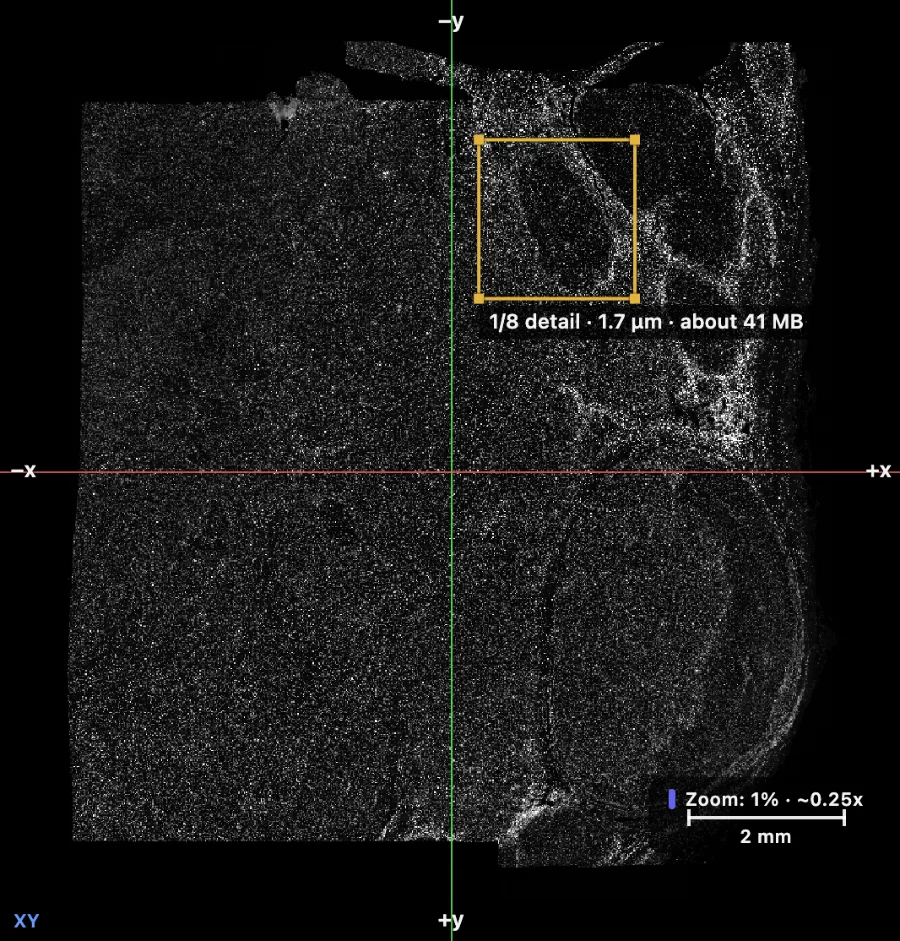
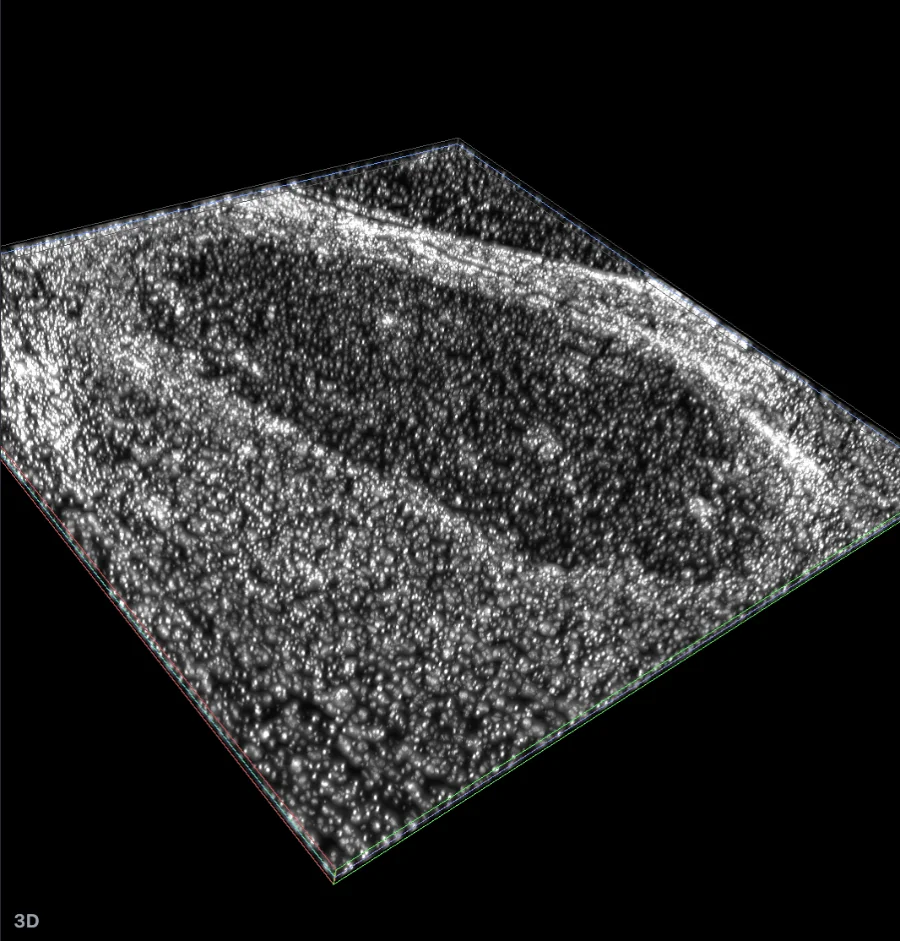
That box in 3D, at 1/8 detail, about 41 MB. The same shapes show in both, so you can see where you are.
For single nuclei, make the box smaller: 2,048 x 2,048 pixels shows at full detail, about 130 MB. DAPI of a Xenium slide of liver tissue, BioImage Archive S-BIAD2339, CC0. MIP.
Workflow: a tall stack
A stack taller than the graphics card allows does not fit as a volume at any zoom in X and Y.
- Choose Region.
- On the XZ panel, drag a box over fewer z-sections, until the readout turns green or amber.
Fewer z-sections also leave room for more detail in X and Y under your 3D memory setting.
Share a box
Link carries the box, its turn and the camera, so a colleague opens the same cut. It opens in Crosshair, so a stray drag cannot change the box. An image you reopen from Recent comes back with the tool it was saved in, Region included. The address bar does not follow the box as you work, and reloading the page drops it, so use Link to keep a box. To write one by hand, see Link parameters.
Gotchas
- A drag inside the box moves it. To draw a new one, start outside it.
- A new box keeps the third axis. A new box on XY keeps the z-sections the old box had. On XZ or YZ it keeps the Y or the X, and all of it when there was no box.
- A thin box is hard to grab at low zoom. Zoom in on that panel first. On a box thinner than its handles, a corner acts as a side.
- Quick views refit the box, so they lose your zoom. A double-click on the 3D panel does the same.
- Sync zoom is on by default, so zooming XY zooms XZ and YZ too. A zoom on XZ or YZ then zooms XY as well, and X and Y narrow with it. To narrow only the z-sections, turn Sync zoom off under View and zoom XZ or YZ.
- The box stays when you switch to 2D and back, and across the series of one image when they have the same size. Another image drops it. 2D does not change. It stays as you step through time.
- Data you read is kept for a while, so a box you come back to opens faster.
- The crosshair can sit outside the box. It is then drawn on the edge of the box.
- Shapes that touch the box show in 3D. One that crosses the edge shows past it, though a shape much larger than the box can be cut when you turn the view. The planes show all of them.
- A turned box reads more. 3D reads the straight box around it, about 1.4 times as wide at 45°, so the readout can go from green to amber as you turn. A turn that comes back inside what 3D has read reads nothing.
- A turn too large for 3D keeps what is on screen, and the readout says so.
- Structures stay whole in a turned box, as they do at the edge of a straight one, and one in front of the cut can hide it. Hide it with its 3D switch. Label surfaces are cut, and the cut stays open.
- The first view after a turn can be coarse for a moment when 3D has to read more, and label surfaces build again.
- A box on a flat or stretched volume keeps the wrong proportions. Fix the Z step under Calibration in Info first. See Pixel Size and Magnification.
- A label saved at another size than the image can sit up to one of its larger voxels off.
Image credits
- Zebrafish lateral line primordium, IDR study idr0079, CC BY 4.0 (Hartmann et al. 2020, doi:10.7554/eLife.55913).
- Xenium slide of liver tissue, BioImage Archive S-BIAD2339, CC0.